How to Turn on BitLocker in Windows 10

If your PC computer is lost or stolen, having a password does not protect your data. The thief need not even login to your computer - they can simply remove the hard drive and connect it to a different computer.
However, if the data is encrypted, it is practically impossible for the thief to retrieve. Also, loss or theft of encrypted data is not considered a data breach according to the law.
So encryption protects:
- your clients from identity theft,
- your business from data breach reporting requirements and costs, and
- your reputation.
Microsoft BitLocker provides easy to use encryption for your computer’s data drives. So you can stay protected in case your computer or a data drive is lost or stolen.
Lost or stolen mobile devices are the biggest cause of data breaches, including newsworthy breaches at NASA and Coca Cola.
Requirements
The first requirement is to have the right version of Windows. Most Pro or Ultimate versions of Windows have BitLocker (e.g. Windows Vista and Windows 7: Enterprise and Ultimate editions; Windows 8 and 8.1: Pro and Enterprise editions; Windows 10: Pro, Enterprise, and Education editions).
If you are using a Home version of Windows, it is worth considering an upgrade to the Pro version. (The cost of upgrading your OS alone should be weighed against purchasing a new PC as that will help address the TPM requirement, described below, as well.)
Additionally, having a computer with a Trusted Platform Module (TPM) chip is helpful. Most PCs sold as business PCs (such as the Dell Precision and Optiplex series, Lenovo ThinkCenter series, and HP Pro and Elite among others) do come with a TPM chip. But you can use BitLocker even without it. Get started with a steps below to enable BitLocker. If your device lacks a TPM chip, Windows will prompt you and then you can follow the instructions further down below to use BitLocker without a TPM chip.
Using BitLocker with TPM
To enable BitLocker in Windows 10, open File Explorer and click on This PC.
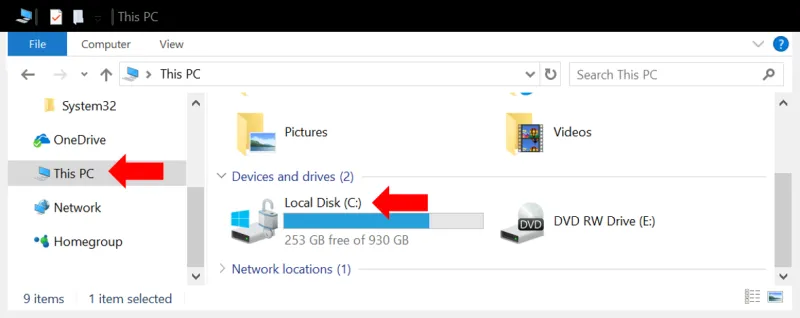
You will see all your hard drives listed. Right click on the primary drive (typically “C:”) and select Turn on BitLocker.
How to Unlock Your Drive
The turn on wizard will ask you to choose How to unlock your drive. Choose enter password. We do not recommend using a USB drive because if the USB drive is left on your desk or near your computer, it can be stolen along with the PC and then the disk is as good as not encrypted.
The setting will also offer you to unlock automatically on this PC. We recommend selecting that because it makes BitLocker completely transparent and easy to use. You do not want to make security unnecessarily hard to use since that may negatively affect productivity and also become a reason to not use it.
Recovery Key
Besides the password, Windows will provide a recovery key in case the password is forgotten. Since this is a password you will probably never use (the disk will be set to unlock automatically on the computer), it is easy to forget or loose track of. Also, if you used the USB drive option to unlock the drive and the USB drive malfunctions or is lost, you would again need the recovery key.
Save this recovery key somewhere away from the PC. If the PC or its storage device and a printout of the recovery key are stolen together, it is as good as not encrypted in the first place. That would be like leaving your house key at the front door.
A good place is to store it in your Microsoft Account online by selecting “Save to your Microsoft Account.” Alternatively, or additionally, you could also store it in your secure document portal.
Once you make your selection in the turn on BitLocker wizard, the encryption process starts. Once done, your primary drive will be encrypted. You are all set. You will not notice any difference in how you use your computer. So BitLocker will not affect your productivity. It will simply provide you data protection through encryption.
For more details see instructions here, and should you want to understand all its advanced options read this, and this, more specifically for Windows 10.No TPM?
If Windows prompts you about a missing TPM module, and you have a business or office use computer, it is worth checking if the TPM module is configured correctly. The TPM module may actually be present but just not enabled.
First press the Windows key and R key simultaneously. In the command prompt that opens, type devmgmt.msc. Alternatively, you could type “Device Manager” in the search box near the Windows Start icon (lower left of screen) and select Device Manager from the results.
In the Device Manager window that opens look for “Security Devices” and upon expanding that you should see “Trusted Platform Module” followed by a version number. You could right click it to see if the settings for it allow you to enable it.
If this does not show you a TPM, try the following: Press the Windows and R keys simultaneously and type tpm.msc.
In the Trusted Platform Module Management window that opens, look at the middle pane to see if a TPM exists. If yes, you would simply use the options in the right pane of that window to prepare and enable it.
The TPM may exist and yet the above two methods may fail to show it. This happens when the TPM is disabled in BIOS settings. Reboot the computer and access the BIOS settings. (The method to access BIOS settings varies across computers. It typically involves pressing a specific key or key combination during the computer startup.)
Once in BIOS settings, find a setting related to TPM, Trusted Computing, Security devices, or something similar. Once you locate the TPM setting within it, make sure to change it to Enabled or On, depending on the BIOS options.
Once enabled, you can proceed to the [above steps to use BitLocker with a TPM](# withTPM).
If the computer does not have a TPM chip, proceed to the steps below.
Using BitLocker without TPM
Without a TPM chip, using BitLocker requires the use of a startup password. This introduces a minor inconvenience every time you restart your computer. Also, if the PC received updates overnight and the update required it to be restarted, the computer will not be able to perform the restart until you arrive and enter the startup password. Other than this, BitLocker will behave exactly as with a TPM, and you will not notice it when using the computer after the startup.
If your PC does not have a TPM, and you select “Turn on BitLocker,” you will get a message asking you to enable Require additional authentication at startup. To do this,
-
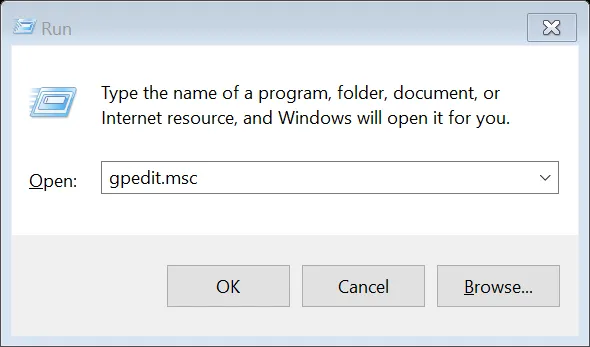
Press the Windows and R keys simultaneously, to get a command window like the one below. Type the command “GPEDIT.MSC” (without quotes) and press OK.
-
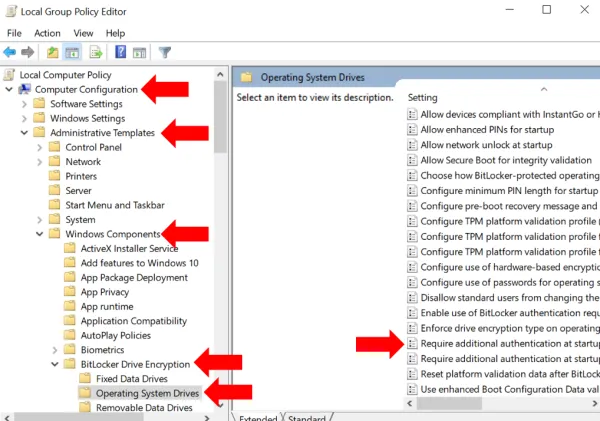
A new window called “Local Group Policy Editor” opens: go to Computer Configuration > Administrative Templates > Windows Components > Bit Locker Drive Encryption and from the expanded list click to select Operating System Devices.
-
In the right pane, select Require additional authentication at startup.
-
On the dialog box that opens, select Enabled and under Options, ensure that Allow Bit Locker without a compatible TPM checkbox is checked. Click OK to close the dialog and then close the Local Group Policy Editor window as well.
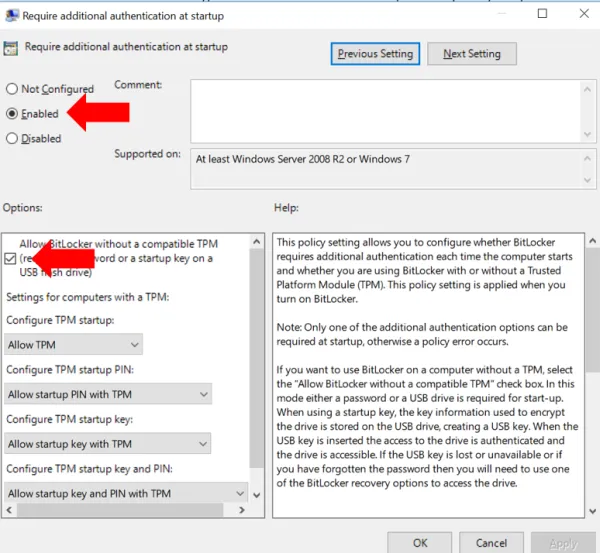
Reboot your computer for the policy changes made above to take effect.
Now go back to the primary drive under This PC and again right click and Turn on BitLocker. From here on the steps are similar to [enabling BitLocker with a TPM](# withTPM) as described above. Make sure to save your recovery keys in a safe place.

Encrypt All Drives
You should enable BitLocker on all storage drives - both internal and external. Simply repeat the above steps on each data drive on your computer, listed under This PC.
External drives include any USB disks, thumb drives, SD cards and the like that you connect to your PC to store data. We do not recommend using external drives to the extent possible because even after encryption, they remain difficult to track. It is not easy to ensure that every such drive is encrypted, is not accidentally decrypted, and that you know the password or recovery key for each.
-
If you used such USB drives to move data among PCs consider using a free secure document portal to move data.
-
If you use such a drive for backup, consider a cloud based backup service with encryption, such as CrashPlan or Carbonite. Both allow using an encryption key managed by them, or optionally known only to you.
If you must use an external disk for backup, say in addition to the cloud backup, do enable BitLocker on it. For convenience, you may set it to unlock automatically when attached to this specific computer. This way you do not need to type in the BitLocker password every time to unlock the disk. However, be aware that should you actually need to use the backup, which usually means connecting the backup drive to a different PC, you will need either the BitLocker password or recovery key. So do save them somewhere safe (in your Microsoft account or a free secure document portal).
