How To Quickly Satisfy IRS Guidelines for Tax Preparers

Is it worth checking out the IRS Guidelines for tax preparers? The new IRS guidelines help you protect your business, avoid losing clients, and compete effectively with the big firms.
The guidelines address very real risks and describe what you need to protect. However, they do not specify how, since that can vary for different firms. That is what we will cover here. This article breaks it down into easy steps that you can take one at a time as time permits. And we can provide a free data security template that you can fill out to quickly document your security risks and safeguards - just contact us and we will email it to you.
Why Does It Matter, Really?
Accounting practices have already started suffering data leaks. For instance, John Williamson, CPA, from Southern California had his car stolen in February 2017. There was a laptop in the trunk with his tax-prep clients’ data.
What the thief got: What do you think is worth more for the thief - the used car or the data on the laptop? Each identity sells for $20-$150 on the black market, depending on the level of information. Given that tax forms have pretty detailed information for each tax client, their spouses and dependents, we would estimate $100 per identity. So if the laptop had a 100 clients, with an average family size of 4 that’s already $40,000 of easy money for the thief. And of course, the stolen car may be worth something too.
CPA’s loss: The actual business loss can be much greater than what the thief got. And most of it is not covered by your general liability or errors and omissions (professional liability) insurance.
-
His mandatory data breach report indicates that he purchased Identity theft protection for each of his clients for a period of 2 years. Again, assuming a 100 clients, at $10/month, that might add up to $24,000.
-
Were the tax returns from the laptop backed up? Or did he have to prepare some or all of them again? Imagine the time cost (and client service experience) of gathering all the information and preparing the paperwork again. And this happened in February - smack in the middle of the busy tax season.
-
The breach report was sent to every client, costing him money and tarnishing his reputation. No easy way to quantify the cost of lost business, but you can guess that it will not be trivial.
-
Add to that, the time cost of cooperating with the law enforcement agencies, and the time spent on taking care of all state and federal data breach procedures.
-
The car and the laptop were a loss too, but we do not include those as they are likely to be covered under insurance.
Today’s identity thieves are a formidable enemy. They are an adaptive adversary, constantly learning and changing their tactics to circumvent the safeguards and filters put in place to stop them from committing their crimes. (IRS, Publication 4557)
The identity thieves specifically target tax preparers, because they can use the stolen tax client information to file fraudulent tax returns and pocket the refunds. They do not care if, in the process, your business ends up as roadkill.
The Gramm-Leach-Bliley act in fact mandates accountants to protect client data, and specifies penalties including a $10,000 fine per violation, and imprisonment of 5 to 12 years.
Following the simple steps described in this article will
- Protect your business and revenue
- Help compete effectively against bigger firms
- Provide you a readymade template to assess your risk and select the right safeguards
- Increase your expertise in technology risk, following SAS 145 recommendations.
Data Protection Simplified
Data is protected if:
-
No unauthorized person can access, modify or destroy the data. While stolen data is a problem for sure, even the destruction of data in the middle of the busy tax season will be a nightmare.
-
The data must remain available to authorized persons. Ransomware attacks for example, do not steal the data but simply lock up your data making it inaccessible, unless you pay the ransom.
IRS Pub. 4557 provides 7 checklists that help identify what you need to do, but the details of how you do it are left open, and can vary based on the size and complexity of your practice. We describe the simple steps that you can take to safeguard your accounting practice. Once these are done, filling out the IRS checklists will be straightforward and we do that toward the end.
Just like protecting a house means locking all doors that can be used for entry, protecting data boils down to protecting against various ways that can be used to get to it. For information security, it helps to consider two types of safeguards: physical and digital.
Physical Safeguards
Where all do you store information - at your office, home, or both? Does your firms have multiple office facilities? Each such location or facility needs to be assessed separately since they may vary in building characteristics, lease agreement details, and nature of visitors.
Client information can be on paper copies (hardcopy) or in digital format. Physical safeguards are needed to protect both.
For each facility, provide:
Facility level access control
Your home or office probably already has a secure lock with a deadbolt, either with a mechanical key, a security code, or an electronic keyfob. So this should already be taken care.
But if the current lock is not a secure one, change it. If it’s a rented property, you should always get the landlord’s permission and ensure that the landlord has a key to the new lock. Facility level access control reduces the probability of malicious physical access to your computers and paperwork.
Second level access control
A second level access control is almost always needed since the facility itself can be accessed by unauthorized personnel, including visitors, clients, maintenance staff, housekeepers, cleaners or others. You may not always have control over which vendors are hired, or on the employees hired by those vendors, let alone the authority or resources to run background checks on them. Even if your office is a single room, with no facility maintenance staff access, and you are always present when clients visit, a second level access control is still handy should you have to step out for a minute to take an urgent phone call or a restroom break while the client waits at the office.
How to implement second level access control?
-
For hardcopy information: Ensure that all confidential paperwork is stored in locked drawers or cabinets. Keep a lockable drawer free to quickly move all your working papers from your desk to it when you leave for the day or leave your desk for an extended period. This helps implement the so called “clean desk policy.”
-
For digital data resources:
- Use a cable lock to secure your computer or laptop to something fixed or to heavy office furniture.
- Do not store client data on removable storage devices (CDs, DVDs, USB/Thumb drives, external storage disks, etc.) as these are very hard to track and secure.
-
Instead use a secure document portal to move data from one computer or location to another.
-
For backups, you have the following options to secure it:
- Use a secure cloud based backup service (described in a later section)
- Use encrypted drives (described later) only, so that even if the drive is stolen, the data is safe.
-
Only authorized persons should have access to the second level access control keys. So any access must happen in the presence of an authorized person.
Additional layers of access control, such as locks at individual office doors within a facility, can enhance convenience and security. For instance, cleaning services hired to spruce up the front office area after hours, will be prevented from accessing individual staff offices, which may be cleaned only when a staff member is present.
Printers and faxes may also need a second level access control. Some printers and faxes can save incoming files electronically, and only print them when the user enters a security code, with the expectation that the user will remove the printed material from the device immediately following the printing. Otherwise, such devices may have to be placed in a locked office not accessible to unauthorized persons, such as to protect incoming client faxes from being accessed by after-hours facility maintenance staff. Using an electronic fax (such as Faxage) is a good option to prevent incoming faxes from being printed without supervision.
The above steps take care of a large fraction of security risks and make your firm a less attractive target. These should be implemented by firms of all sizes, including solo practices.
You may also want to consider additional steps, especially at larger firms and if implementing security policies to pass external audit requirements. You will need to put procedures in place for protection of data in case of fires or natural disasters (e.g. floods, earthquakes, tornadoes), process to access data when a key staff member with access is unavailable (e.g. a client return needs to be amended urgently when the responsible partner or staff member is on vacation), requirements for staff background checks, and disciplinary actions for violation of adopted security practices by staff members. The exact list of such steps depends on the security standard you wish to comply with.
Contact us for a free data security template and check-off your physical data protection safeguards. It not only ensures you have your bases covered, but also serves as documentation you should maintain per IRS checklists.

Digital Safeguards: Devices
Digital data offers tremendous convenience and cost efficiency. From a security perspective, in many ways protecting digital data is easier as well. For instance, protecting digital data against fire or water leaks is so much more practical through an off-site backup, than maintaining photocopies of physical documents.
However, digital security can also introduce complexities. We first discuss protecting the devices and then your data outside your own devices.
Device Access Control
Access control is designed to prevent unauthorized persons from logging in to one your business computers. It typically relies on using password controlled user accounts. The following best practices help ensure that your account logins are secure:
Passwords: Always enable computer accounts with passwords. Use standard accounts, and reserve administrative accounts only for users who require them. Enforce strong passwords. To require strong passwords for all users, on each of your computers, follow the following steps with an administrator account.
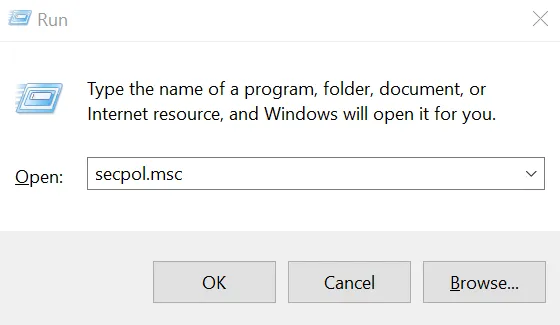
Press the Windows key and “R” key simultaneously. In the little popup window towards bottom left, type “secpol.msc” without the quotes. Click OK.
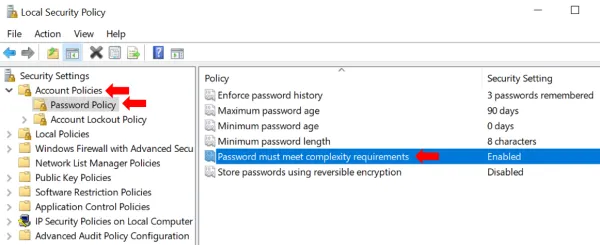
In the window that opens, double click Account Policies and then Password Policy. You will see several password related settings in the right pane.
- Make sure that “Store passwords using reversible encryption” is Disabled. By default, passwords are stored with non-reversible encryption, so that someone who steals the password file cannot get the actual passwords. Storing them with reversible encryption is almost
- Then double click “Password must meet complexity requirements” and set it to enabled.
- Optionally, you may also set “Minimum Password length” to ensure long passwords are used and “Maximum password age” to ensure passwords are changed regularly. Also, if setting the maximum password age, it makes sense to set the “Enforce password history” setting to at least 3 to ensure that the previous 3 passwords are not used.
No Guest Accounts: Make sure no guest accounts are enabled. This ensures that an unauthorized person, who happens to be near the computer, cannot just browse the computer for sensitive data and copy it to a USB stick or other removable storage device. Lack of guest accounts provides a first level defense against an unauthorized person accessing the USB ports or other attachments to introduce malware into your system.
Fortunately in Windows 10, there are no guest accounts by default.
Automatic lockout: Set the screen to lock if left unattended for 15 minutes (or a smaller threshold duration). If you have only one user account on your PC, go to “Lock Screen” settings as follows. Type “lock Screen settings” in the search box next to the Windows start button in the lower left and click on the result titled ‘lock screen settings (system settings).’ You should arrive at a screen like so:
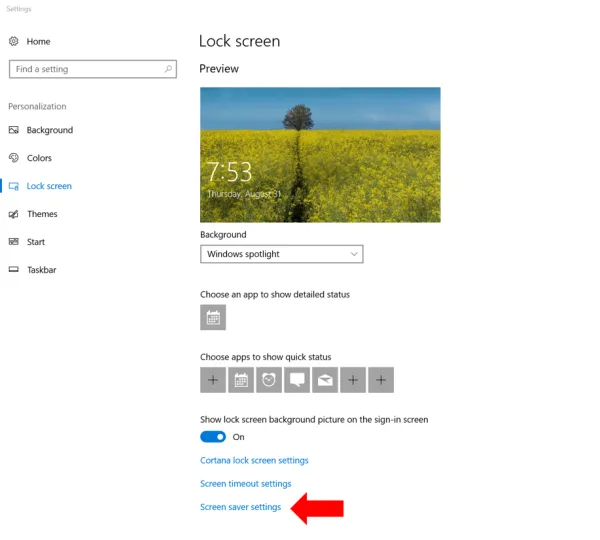
Towards the bottom, click on “Screen saver settings” and you get a popup window like so:
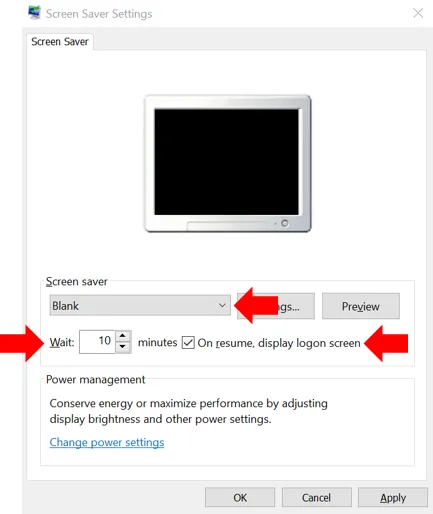
Here, in the screen saver dropdown, select the screen saver of your choice, anything other than none. Then add a checkmark next to “On resume, display logon screen.” Also make sure that the number (of minutes) after Wait is 15 or less. Click OK. Now, whenever this PC is left unattended, it will start a screen saver after the time you specified to wait. And a password will be required to resume.
If you have more than one user accounts on the PC (e.g. you have created separate accounts for your home and work related tasks, or the computer is shared with family or staff), then you need to enforce the screen timeout and lock on all users. See this article for details of how to enforce password requirement after screen timeout in Windows 10.
Additionally, also ensure that a password is required whenever Windows resumes from sleep or a low power mode. Go to Settings -> Accounts-> Sign in Options and under “require Sign In” make sure that When PC wakes up from sleep is selected.

Device encryption
While using computer accounts with passwords prevents casual data browsing by others, passwords do not protect the data in case the computer or its hard disk or storage media is stolen, lost, or copied. That is known as a data breach, and a practical defense is to use encryption.
Windows Computers: Microsoft provides BitLocker on Windows computers. There are two things you need to use it.
-
The right Windows version: Most Pro or Ultimate versions of Windows have BitLocker (e.g. Windows Vista and Windows 7: Enterprise and Ultimate editions; Windows 8 and 8.1: Pro and Enterprise editions; Windows 10: Pro, Enterprise, and Education editions). If you are using a Home version of Windows, it is worth considering an upgrade to the Pro version. (The cost of upgrading your OS alone should be weighed against purchasing a new PC as that will help address the second requirement below as well.)
-
The right hardware: Ideally, you need a computer with a Trusted Platform Module (TPM) chip. If you bought a business or work PC, then it likely came with a TPM. Lower priced desktops and laptops sold as ‘home use’ devices may not have a TPM. If your PC does not have a TPM, BitLocker can still be used (as described in detail below), but will require a startup password. This reduces convenience because you will need to enter an additional password every time the computer boots up. If Windows received an update overnight, the PC will not be powered up the next morning when you arrive since it will need you to enter that startup password before it can start up.
To enable BitLocker in Windows 10, open File Explorer and click on This PC.
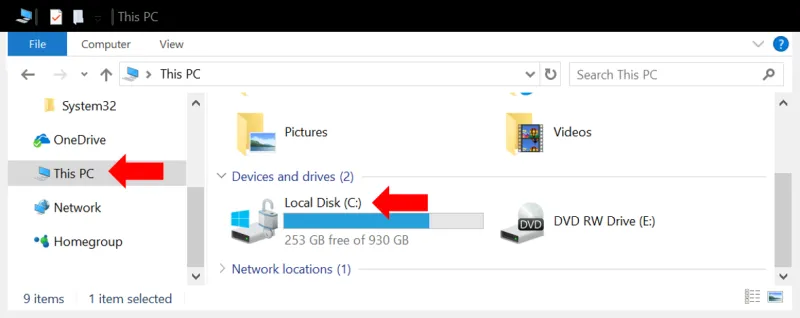
You will see all your hard drives listed. Right click on the primary drive (typically “C:”) and select Turn on BitLocker.
The turn on wizard will ask you to choose How to unlock your drive. Choose enter password. We do not recommend using a USB drive because if the USB drive is left on your desk or near your computer, it can be stolen along with the PC and then the disk is as good as not encrypted.
Recovery Key: Besides the password, Windows will provide a recovery key in case the password is forgotten (or if you used the USB drive option and the drive malfunctions). Save this recovery key somewhere away from the PC. (If the PC or its storage device and a printout of the password are stolen together, it is as good as not encrypted in the first place. That would be like leaving your house key at the front door.). A good place is to store it in your Microsoft Account online by selecting “Save to your Microsoft Account.” Alternatively, or additionally, you could also store it in your secure document portal.
For more details see instructions here, and should you want to understand all its advanced options read this, and this, more specifically for Windows 10.
Once you make your selection in the turn on BitLocker wizard, the encryption process starts. Once done, your primary drive will be encrypted. You should repeat this step on all storage drives.
If your PC does not have a TPM, and you select “Turn on BitLocker,” you will get a message asking you to enable “Require additional authentication at startup.” To do this, press the Windows key and R simultaneously, to get a command window like the one below. Type the command “GPEDIT.MSC” (without quotes) and press OK.
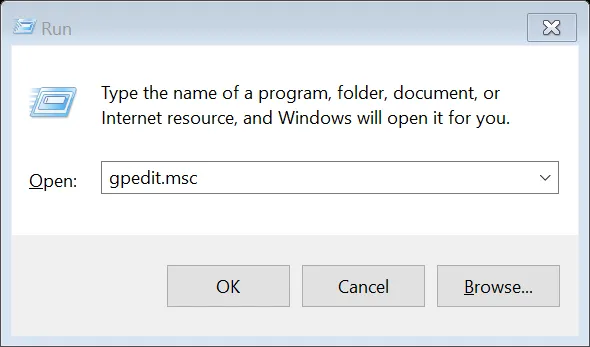
A new window called “Local Group Policy Editor” opens: go to Computer Configuration > Administrative Templates > Windows Components > Bit Locker Drive Encryption and from the expanded list click to select Operating System Devices. In the right pane, select Require additional authentication at startup.
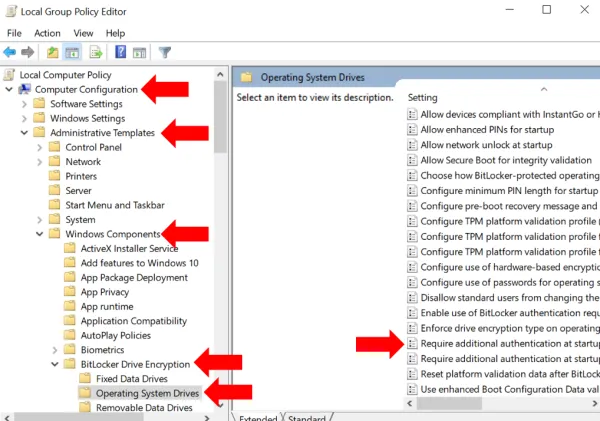
On the dialog box that opens, select Enabled and under Options, ensure that Allow Bit Locker without a compatible TPM checkbox is checked. Click OK to close the dialog and then close the Local Group Policy Editor window as well.
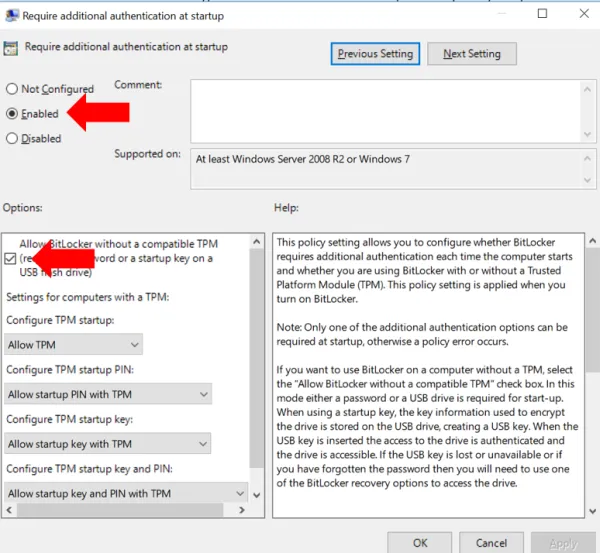
Now go back to the primary drive under This PC and again right click and Turn on BitLocker. Follow the steps described previously to save the recovery keys.
External Drives: You need to enable BitLocker on any external drives, USB disks, thumb drives and the like connected to your PC. We do not recommend using external drives to the extent possible because even after encryption, they remain difficult to track. It is not easy to ensure that every such drive is encrypted, is not accidentally decrypted, and that you know the password or recovery key for each. If you used such USB drives to move data among PCs consider using a free secure document portal to move data. If you use such a drive for backup, consider a cloud based backup service with encryption, such as CrashPlan or Carbonite. Both allow using an encryption key managed by them, or optionally known only to you.
If you must use an external disk for backup, say in addition to the cloud backup, do enable BitLocker on it. For convenience, you may set it to unlock automatically when attached to this specific computer. This way you do not need to type in the BitLocker password every time to unlock the disk. However, be aware that should you actually need to use the backup, which usually means connecting the backup drive to a different PC, you will need either the BitLocker password or recovery key. So do save them somewhere safe (in your Microsoft account or a free secure document portal).
Mac OS: Similar to BitLocker, Macs have FileVault. Its relatively easy to setup, as described here. Choose Apple menu > System Preferences, then click Security & Privacy. Click the FileVault tab. Click the Lock button, then enter an administrator name and password. Click Turn On FileVault.
This will also generate a recovery key, that helps decrypt your disk in case you forget your Mac login password or if the Mac breaks down and the disk is to be opened on another Mac. You must store this key somewhere other than on the Mac for which the key is generated. It is best not to save it near the Mac itself since in case of theft, if the thief has both the Mac and your recovery key, encryption will be useless. Apple offers to store it for you on their servers. Or, you can save it in your document portal, in a folder for yourself.
iPhones (and other iOS devices): On iOS devices, you simply need to turn on a passcode, as explained here. Once you do that, you will see that the bottom of the Touch ID and Passcode settings screen, it says “data protection is enabled” - meaning that most of your data is encrypted (though not all data, since some apps may not be designed for security).
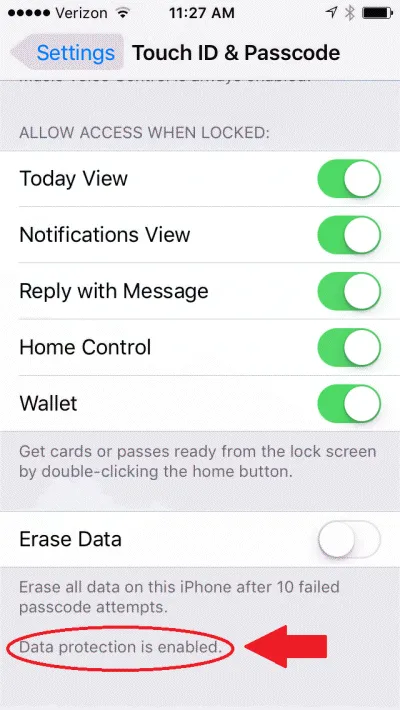
Also, make sure that remote wipe is enabled, to help erase data in case the iPhone is lost or stolen. To do this, turn on Find My iPhone as described here.
Android: On Android devices you need to enable the screen lock (Pattern, PIN, or Password) and require it at startup, as described here.
Any removable storage can be included for encryption by setting it up as internal storage: insert new media and tap Setup and then Use as internal storage.
Also, to enable remote wipe, turn on “Allow remote lock and erase” under Settings -> Google (or Google Settings) -> Security -> Find My Device (or Android Device Manager), as described here.
Malware protection
Malware refers to “bad” software programs that are designed by hackers to use your computer or data for their selfish purposes.
Malware includes viruses, worms, trojans, backdoors, ransomware, key-loggers, and several other types of software. Some malware may not be meant to directly harm your computer but simply use your computing resources for the hacker to run a DDoS attack on other websites. In the process, this may slow down your computer and network, or maybe end up in your computer getting disconnected from the network if the attack defenses recognize your computer as infected.
However, many types of malware more directly harm your business. They may destroy data on your computer or make it unusable. They may show annoying popups. They may establish a channel for attackers to access your computer and steal data from it at future times. They may record every keystroke you type, and hence steal all passwords or other secrets that you may not even have stored on your computer. Ransomware may lock up the data on your computer and ask for a payment to be made before it will release your data (paying the ransom does not guarantee that they will indeed unlock your data). They may steal your client list and send them emails with undesirable content.
In short, malware can cause significant business loss and tarnish your reputation due to delays or data loss caused. Further, if a client realizes that your computer was the source of malware that they received, the client may lose trust in your ability to run a secure business.
How to Protect Against Malware: Protection against malware involves two components:
- preventing malware from entering your PC
- having a practical contingency plan should malware make its way in
Prevent Malware: To prevent malware from entering your computer, there are a couple of automated steps to take:
-
Keep your operating system (Windows), web browsers (IE, Chrome or whichever you use), and software up to date. Updates continually fix vulnerabilities that malware may have exploited. Use the newest operating system version - newer versions have fewer malware written for them. Most software provides settings to update itself automatically. For Windows 10, the default setting is to automatically install updates (though you can pause it temporarily under advanced settings).
-
Install an antivirus program. Windows 10 comes with Windows Defender built in. It has good protection and does not interfere with your legitimate programs. Type “Windows Defender” in the search box near the Windows Start icon and from the search results open Windows Defender Security Center. Here you can verify that malware protection is turned on and active.
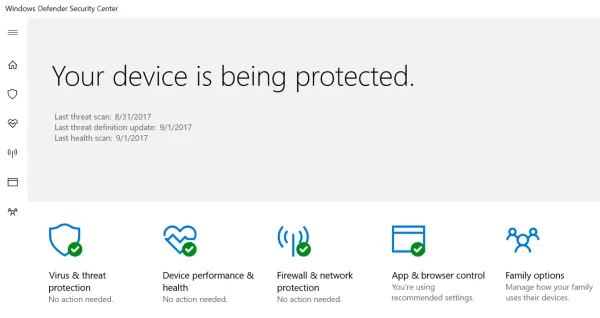
Alternatively, there are several free ones available such as Avira and Avast.
However, having the latest updates and an antivirus is not enough. Somewhat like a flu-vaccine, the anti-virus programs may prevent some viruses but not all. The second aspect is your and your team’s own security awareness. Do not click on links in emails or download attachments if the email is not from a known trusted party. Many emails pretend to be from large companies with which you likely have transacted business, and the email subject may talk about a pending order delivery, an issue with your transaction or account. Other emails may offer something enticing to make you click on a link or open an attachment. These are examples of “phishing” and you should never take their bait.
Contingency Plan: Regardless of your best intentions, malware may find its way in. That is where the contingency plan comes in. The three steps to prepare for an attack are: backup, backup, and backup. When you have a recent backup of your machine available, you can confidently proceed to removing the malware or if necessary, wipe the computer and re-install the operating system from scratch. Or in the worst case, obtain a spare PC. Since the backup will allow you to restore all your data to the restored or new PC.
Whenever you detect malware on your computer (computer acting slow, unwanted popups, websites do not behave as expected, programs open or close unexpectedly, or another symptom), it is best to disconnect it from the network. Disconnect the wired networked cable. Turn off the WiFi network at your facility (simply turning off the WiFi settings on the infected PC may not suffice since the malware may turn it back on).
Then, using another computer or mobile device, find the instructions for your anti-virus program to run a scan and attempt to remove the malware. For instance, Windows Defender instructions are here. If such a removal attempt is not successful, you may need to completely wipe the computer by installing the operating system and removing all previous contents of the storage devices connected to the computer.
To make sure you covered all the device protection safeguards, contact us for a free data security template. The digital safeguards worksheet within this template makes sure all the above steps are taken care.
Advanced Device Security Setup
For a more sophisticated setup, that becomes necessary if you have more than a few staff members, you would want all devices to be centrally managed such that strong passwords are enforced, encryption is enforced, antivirus is maintained centrally, and certain data protection policies can be automated. This typically requires hiring an IT pro to take care if it for you.
An advanced setup may also provide for a review of audit logs for suspicious activity such as unsuccessful login attempts, excessive logins or data transfer from a computer, or installation of unapproved programs. A mobile device management (MDM) solution is typically also considered necessary to ensure all required security policies are enforced across all mobile devices used.

Digital Safeguards: Data Communication
Data is at risk whenever it leaves your device - typically over the network. Data traveling over a network can often be read (snooped) by unauthorized parties.
For instance, someone parked near your location can intercept and read all data sent over your WiFi network, even without connecting to your network, using just a laptop and some free software. Even data on your wired network can be intercepted using relatively cheap and inconspicuous devices attached to network cables , possibly outside your office or facility.
The following three steps help protect against such data leaks:
- Encrypt your WiFi network
- Use encrypted email or document portals for communicating sensitive information
- Do not enter passwords or sensitive data on websites that do not use HTTPS
Encrypting your WiFi network
The best current standard for encryption for WiFi networks is WPA2. To ensure you are using it, logon to your wireless router’s management page and under WiFi settings make sure you are using WPA2 (it may be labelled WPA2-PSK or WPA2-Personal on your WiFi router). When WPA2 is enabled, the data sent between your wireless devices (computers, phones) and the router is encrypted on the wireless channel. So someone eavesdropping on your network traffic, say from a car parked nearby, will only see encrypted data. (Some routers may offer the WPA2-Enterprise option as well - that is meant for an enterprise network with many computers and most people would want the help of an IT pro to set that up.).
The steps below explain this in more detail:
Connect to your router: To connect to your WiFi router’s management/settings page, you will typically visit an address such as 192.168.1.1 in your web browser from a computer connected to that router’s network. The exact address to use may be listed on a sticker attached to your router. Alternatively, in Windows, open a command prompt: press the Windows and “R” keys simultaneously, and in the little window that opens up, type “cmd”:
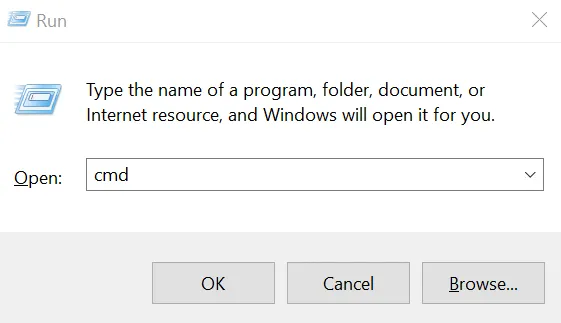
Press OK and in the command prompt that opens, type the command “ipconfig.” Press enter. In the response printed by that command, look for your network adapter that is being used, usually labelled “Ethernet adapter” or “Wireless LAN adapter…”

Look at the entry next to “Default Gateway” and that is the router’s network address. For instance, if the default gateway shows 192.168.0.1, then you would connect to 192.168.0.1 using your web browser.
This page will ask you to login. Typically, the username is “admin” and the password is what you have set when you set the router up. If you have not changed the password from the default setting, use the default password and change it immediately. The default password is not secret and anyone may use it to connect to your router, to effectively have complete control of your network including its security settings.
Some of the newer routers may even allow you to visit the router management page on a product specific website such as http://linksyssmartwifi.com/ for Linksys routers.
Find the wireless settings page: Once logged in, look for a menu option or link to “Wireless Network” or Wireless settings, or Wireless security. These settings may sometimes be under Router Settings or Wireless depending on your wireless router’s model and brand.
Here you will likely find a setting called security mode or something similar that has options such as WEP, WPA, WPA2-PSK, or WPA2-Personal. If WPA2 (or WPA2-Personal, WPA2-PSK) is not already selected, select that. You will also be required to set up a password for your WiFi network. Do not use a password that you might be using for other websites since this password may have to be shared with everyone who needs to connect a device to your WiFi network, such as your staff or family members.
After this setting is changed, any devices, such as your computers or phones using the WiFi network will need to reconnect to the WiFi network, using the network password you set above.
Encrypted Email or Document Portals
You may have noticed that banks never send you statements over email. That is because email is not secure. Even if your computer’s connection to the mail service is secure, there is no guarantee as to what happens when the email leaves your email server to start its journey towards the recipient’s email server and eventually their device.
Up to 20% of all emails are routinely attacked, say researchers at Google, University of Michigan and University of Illinois Urbana Champaign, after studying 700,000 email servers.
Major email providers (Hotmail, Yahoo, Gmail, AOL) and millions of other email domains “offer no protection against active adversaries” who could observe or inject data between an email server and the Internet, says Prof Alex Snoeren and his fellow computer scientists at University of California San Diego, based on their measurements of current email services.
The fact is that security configurations vary greatly across email servers and data may be sent unencrypted even between two email servers that both support encryption, if their encryption settings are incompatible.
The best defense is to use a secure document portal. Encyro provides a free document portal that encrypts your data both on the wire and when stored, using secure bank-level encryption technologies, and only stores data in security certified data centers. You simply send a message or attachment like you would using email and Encyro automatically creates a document portal for you and your client.
-
In your portal, you can track all messages and documents organized by client folders. These remained stored securely and backed up offsite with encryption.
-
Your clients are not required to create an Encyro account and simply access the document securely using a secure link sent to their email. They may of course create a free account if they wish, and they too get continued access to the secure documents and messages, they receive from you, and optionally send to others.
-
Unlike other portals, Encyro allows your clients to forward documents to others (e.g. they may send their previous year tax return to their loan officer for a refinancing application). This helps your clients stick with you, since your portal becomes part of a rich network of multiple services that they use.
You can try how easy it is for your clients to receive documents you send using Encyro, using the demo account below.

Use HTTPS
Never enter passwords or any sensitive information such as client data on websites that do not use HTTPS. HTTPS encrypts the data between your computer and the website. So, as the data travels across the Internet across many types of network equipment, someone eavesdropping on your data will only see encrypted information and will not be able to steal your actual data.
Websites that use HTTPS will show a web address that starts with https:// instead of http:// (note that S at the end). Your web-browser will show you when a website uses HTTPS.
For instance, Chrome shows a “green lock icon” on the left in the browser web-address window:

Next to the green lock icon, you might either see the word “Secure” or the name of the company that owns the website.
Internet Explorer shows a gray lock icon on the right:

Microsoft Edge shows a gray or green lock icon on the left:

Web-browsers on the phones similarly show a lock icon as well. Safari on iPhones for instance shows a black lock icon.
Most legit businesses that ask for any sensitive information, including a password to login, do use HTTPS. New browsers will even show you a warning when a website appears to be asking for your password on an insecure connection.
If a vendor service that you use asks for your password or any sensitive information on a website that is not HTTPS protected, it usually demonstrates lack of security awareness or concern for your data. It could even mean the website you are visiting is not the intended one but a fake. It is best to stay away from such websites.
Even if your WiFi network is encrypted, that encryption ends the moment the data from your computer or device reaches the router. From the router to its destination on the Internet, the data is NOT encrypted by WPA2. Also, WPA2 does not encrypt the data on the wired connections. Wired connections are harder to eavesdrop on since they require installing a “bug” device on the network cables but such devices are cheap and readily available.
That is why using HTTPS is very important - to make sure the data remains encrypted all the way to its destination.
Use the digital safeguards: data communications worksheet in the free data security template, that you can get by contacting us, to verify that the steps discussed in this section are taken care of.
Data Disposal
For physical (paper) copies, it is obvious that all sensitive paperwork should be shredded.
Maintaining a local shredder is an option, though often too slow for the volume of shredding required. A more practical solution is to collect paperwork to shred in a secure bin that allows anyone to drop in papers but controls access for removing papers from it. This bin should itself be secured (e.g. with a cable lock) to the building. Periodically, the bin is emptied by a collection service provided by a secure shredding vendor.
If your shredding volume is not high enough to warrant a scheduled collection service, you or your staff may take the paperwork to a shredding facility. Many office supply stores offer shredding services.
For digital data, deleting a file does not remove it from the hard disk or other storage media (except in case of certain SSD drives on specific operating systems). It simply marks the storage area as available to store new files. Free software tools can be used to recover data that was previously deleted, even from files that were written over with new files.
So if you are disposing off an old computer or storage media, you have two options:
-
Data destruction services: Many PC recycle facilities offer data destruction (a.k.a. disk shredding) services, and can even give you a certificate stating that the disks or storage media you submitted have been destroyed in a manner that does not allow recovering any data. The service is not free.
-
Disk Wipe: If the computer is still working, and you are willing to spend the time, install a free disk wipe software such as DiskWipe, Eraser, or paid ones such as Active @ KillDisk and Shreddit. Then use that software to erase all data on the computer’s hard disk. These software programs follow standard processes to write dummy data on all of the disk space multiple times, to make your confidential data unreadable. This is a good option if you are re-purposing the PC for other uses.
Smartphones: If your phones have any sensitive data (in email, or documents saved from a document portal, or a picture taken at a client meeting with whiteboard notes), again use a data destruction service. They will shred the device physically.
If the device is lost, you can use the remote wipe feature available on iPhone (as described here) and Android (see here). This assumes that you had set up the device correctly to begin with, as we covered in the digital safeguards section above.
WARNING: Remote wipe only happens when the device is turned on and connected to the network. If you had not setup device encryption, data can still be read by someone in possession of the device without turning it on or by preventing it from connecting to the network (e.g. by removing the SIM). Hence it is important to encrypt the device as described in the previous section.
Cloud Accounts: If you stop using an online service, it is not sufficient to just log out and stop logging in again. The data from your past usage is still stored in your online account with that service provider.
At the very least, you should retrieve all necessary data and close the account. Closing an account typically does not delete it immediately. You may have to contact their support desk to find out when, if at all, closed accounts are deleted. Some service providers keep the closed accounts for a long time, hoping their customer may return to re-activate the account. If that is the case, you may have to request deleting your data through their support channel. Different service providers may vary in terms of their data retention and disposal policies. So the best strategy is to find out what is best mitigation available and implement that.
Vendors or Service Providers
If you use vendors such as book-keepers or others who will have access to sensitive information, you need to verify that the vendors have appropriate safeguards in place.
For certain vendors, such as an online tax software provider, your secure document portal, or encrypted backup provider, such a verification may be easy to obtain from their website.
For others, especially local service providers, you may have to explicitly ask the owner or your account representative. If they do not already have the right safeguards in place, you may have to work with them to start enforcing the same security standards that you use, or search for alternative providers. If you use written contracts (which you should), you may add security as a requirement in the contract itself.
-
If you will be getting your own security setup audited or certified for compliance with security standards, you will very likely need to obtain written security and privacy policies from each of your vendors and also contractually obligate them to follow those policies.
-
If you will obtain a cyber-risk insurance policy to protect yourself against breaches or leaks of customers’ personal information, the underwriter may require certain privacy obligations to be contractually agreed upon by your vendors. The cyber-risk policy is often expensive because identity theft risk is very high and as an accountant you possess significant high-risk customer information.
As far as your clients are concerned, and by law, securing your client’s data is your responsibility.
Contact us to request your free data security template to make sure all the above safeguards are in place for each of your facilities.

IRS Checklists
Back to the checklists in IRS Pub. 4557. These checklists, fundamentally, cover three things:
-
Recognize that your firm needs to secure your client’s information. Designate yourself, and/or team members as the person(s) responsible for security and document that fact.
-
Conduct a risk assessment and implement relevant safeguards. This is what the steps we discussed in the previous section help with. Risk must be managed when you share client information with your vendors or service providers.
-
Periodically re-evaluate and update your security safeguards as your business, technology, or other external factors change. Create a reminder or an appointment in your calendar to re-visit your security assessment in 3-4 months.
Let’s discuss the IRS checklists one by one:
-
Checklist 1: Administrative Activities. This checklist covers conducting a security risk assessment, defining the required safeguards, and designating an individual to implement them. It also covers testing your security plan and addressing deficiencies.
The IRS checklist also covers checking on the FTC Privacy rule to determine if you are required to give privacy notices to your clients. The FTC document includes accountants and tax preparers specifically as activities for which this rule applies, stating that financial activities include “providing financial, investment or economic advisory services. These activities cover services offered by credit counselors, financial planners, tax preparers, accountants, and investment advisors.” The FTC document also explains what the privacy notice should contain, how it may be delivered, and when.
Lastly, it reminds you to ensure that your service providers also have information safeguards in place, and that they commit to handling your clients’ data securely in their contract with you. They should also share their written security policy with you.
-
Checklist 2: Facilities Security. This covers your physical safeguards to prevent unauthorized access, including door locks and secure disposal. If you have already implemented the physical safeguards we discussed above, this portion of the checklist is easy to satisfy.
The IRS checklist also covers protection against natural disasters such as floods and tornadoes as applicable to your location. An offsite data backup goes a long way in protecting your digital data in case of such events. Additionally, you may create a disaster action plan that includes steps such as turning off gas/electric supplies, moving portable equipment and data to a higher level (in case of floods), and maintaining emergency contacts for staff members. You may also consider appropriate building retrofits to reduce damage from such events such as earthquake braces, non-return valves on drains (for flood prone areas), and getting the right insurance.
- Checklist 3: Personnel Security. This checklist covers performing background checks and screening before hiring someone for a position that will give them access to confidential customer information.
It also covers creating and sharing rules of behavior and expected responsibilities in handling customer information, both on paper and using computer systems. You should have your staff sign non-disclosure agreements on the use of all confidential information shared with them.
Also, create and follow correct termination procedures that ensure computer accounts/logins are terminated correctly, access passes and keys are returned or deactivated, and all information in employee possession (laptops, storage devices, etc.) is handed back.
Periodic refresher training is recommended for all staff members. Regularly sharing some of the security articles from this blog can help.
- Checklist 4: Information Systems Security. This checklist covers maintaining access controls that ensure information access (digital or physical) is only granted to those who need it.
It also covers implementing a contingency plan to run your business in case of a disruption such as due to ransomware, unexpected computer failure, or a key staff member being unavailable. Data backups and written procedures to restore data and disrupted systems are essential to help in this regard.
Some of your data may be stored online through various cloud providers, such as Quickbooks Online and the Encyro document portal. Most reputable providers strive to limit downtime and commit to maximum time limits on how long it takes their systems to recover after a major disruption. For instance, Encyro promises a 99.9% (three nines) uptime. That is, the service is expected to remain available 99.9% of the time. To this end Encyro implements automated failover mechanisms that keep online services operational despite equipment failures, with almost no disruption to users. Encyro also uses multi-location backups to protect data from major events such as a data center failure or natural disaster. A recovery time commitment, that is, the time to restore systems after a major event, is placed at 48 hours, though actual recovery is likely to be much quicker. Using reputable cloud services with high availability will help minimize your own business downtime in case of disruptions and disasters affecting their locations.
- Checklist 5: Computer Systems Security. This checklist covers computer system security such as the use of strong passwords, automatic screen locking, data encryption for stored data and when communicating it externally. The techniques discussed in the sections on Digital Safeguards: Devices and Data Communication help meet most of these requirements.
Additionally, you may hire third party services to perform vulnerability scans and penetration tests for your systems. These tests can be moderately to very expensive, depending on whether they cover only automated scans, include custom manual testing, or also include social engineering attacks (e.g. talking your staff into giving away confidential information).
- Checklist 6: Media Security. This checklist reminds you to secure all storage media that is used to store confidential information, and to dispose it off securely. We covered the detailed steps to secure and dispose media in Digital Safeguards: Devices and Data Disposal. So if you implemented those steps, items in this checklist would be easy to check off.
You may also wish to consider meeting the requirements of the FTC Disposal Rule, which are relatively easy to satisfy using the methods we described to destroy data.
- Checklist 7: Certifying Information Systems for Use. This checklist covers official certification of your systems by a security expert. Such a certification can give you greater peace of mind. The audit will likely identify deficiencies that you can fix and also additional risks that you may need to mitigate. Some cyber-risk insurance policies may ask for such an audit and may offer a discounted premium based on it, though most policies do not mandate having an external audit done.
Conclusion
Identity theft is the fastest growing crime in the US and affects more people than any other crime. Data from US Department of Justice shows that 17.6 million Americans suffered identity theft in 2014. The Federal Trade Commission reports that ID theft attacks grow by over 47% every year.
Try obtaining quotes for cyber-risk insurance and you will notice how high the premiums are: that’s because the risk is high. And your general liability or errors and omissions policies will typically not cover data leaks or theft of customers’ personally identifiable information.
For you client affected by identity theft, it may just mean endless hours of frustration fixing their personal information and damage to credit scores, but for your accounting practice, a data leak can wipe away a big portion of your revenue. In fact, sixty percent of small businesses close down after a data breach, according to this report by the US Securities and Exchange Commission.
