Insert fields to fill or sign in
When creating an electronic signature request, or simply a form to be filled without signatures, you must insert the fields that the recipient will complete.
Start an e-sign request as normal. When the PDF file is shown to insert fields, you will see the document, with a list of field types in the left panel. In the image below, these start at the button labeled Signature.
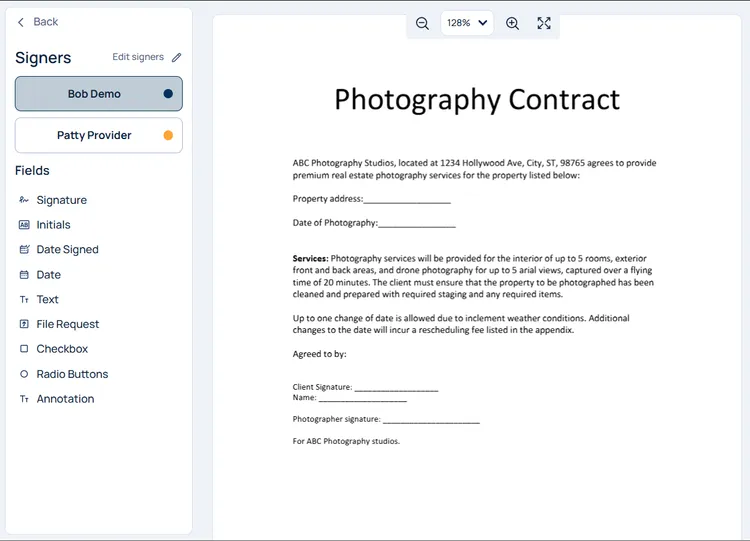
Fields for Signer to Complete
To insert a field:
-
Click the button with that field type. For instance, to let the signer input the client signature needed in the example document above (near the bottom of the document), click the Signature button.
-
Move the mouse to the location where field is to be inserted. (In the above example, one would move the mouse to just after the text ‘Client Signature.’
-
Click at that location. A rectangle will appear at that location indicating that the signer will fill in a signature in that rectangle.
-
Resize: Click the small circle on any of the four corners of the inserted field rectangle and while holding the mouse down, move it to change the size. Release the mouse to set the new size.
-
Move: Click the field and hold the mouse down. Move the mouse to move the field and release the mouse to set the new location. (For the Annotation field, use the top left corner to move.) You may also move the selected field by using the arrow keys on the keyboard.
-
Delete: Right-click on the field and clicking “Delete” in the menu that appears. Alternatively, press BACKSPACE on your keyboard to delete the selected field.
-
Duplicate: To insert another field identical to it, right-click on a field, then click “Duplicate.” You may also use CTRL + D to duplicate the selected field.
-
Copy: To copy a field, right-click on it, then click “Copy.” For the selected field, you may also use CTRL + C.
-
Paste: Right-click anywhere in the document and click “Paste” to paste the copied field. You may also do so by pressing CTRL + V.
-
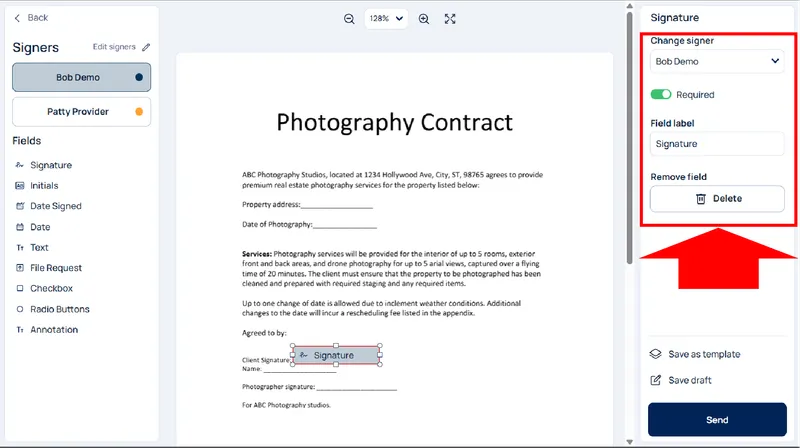
In the right sidebar, you will see additional options for the selected field. By default, the last field you added is selected, but you may click a field to select and configure it.
-
You may change one or more of these settings:
- Label: This indicates what the signer should fill in. For instance, the date field will have a label “Date” by default. You may change it to something more specific, such as “Project end date” if needed.
- Required: This toggle indicates if the recipient is required to complete this field or may skip filling it.
- Prefilled text (for Text fields only): You may also fill the field for a signer if you already know what you expect them to fill in, but want to let them change it if needed. This will save some work for the signer. For instance in the example document shown above, the sender may know the client’s name to be filled in, but may want to allow the client to modify the name such as for spelling, suffix etc.
- Remove: Clicking the Delete button lets you remove this field.
-
Assigned to: This specifies the signer who should fill this fields, if the e-sign request will have multiple recipients completing it. (See the section on multiple signers below.)
Multiple Signers
Multiple signers may have to fill in different fields. To change the signer for a field, click inside the field to open the optional settings box.
Under Assigned To, you will see the currently assigned signer. Initially, this may be the new signer unless you inserted the first signer when prompted upon adding the first field.
-
Click the button below Assigned To and then select from one of the signers shown in the list. The list may only have the current signer. In this case, you may add a signer as follows:
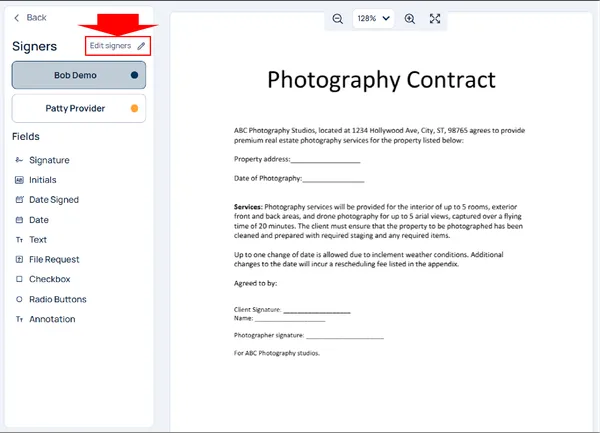
- Click “Edit Signers” near the top right of the left sidebar.
- In the popup window that shows up, click Add Signer and, in the box that opens, add either a name, email, and/or a role for the signer. (The role is for your reference only and is not shown to the signers. You may use roles that help you identify the signer’s responsibility with respect to this contract, such as “buyer”, “new client” or “seller.“)
- Click “Done” to add the signer to your list.
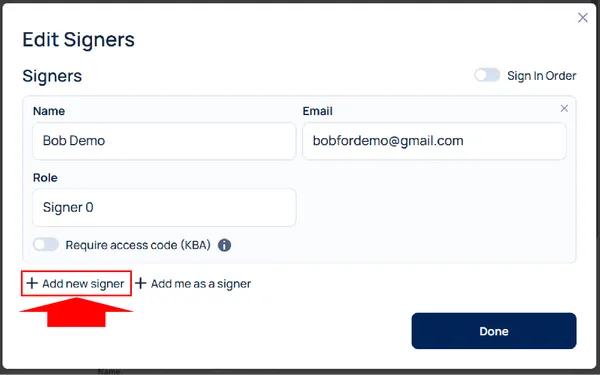
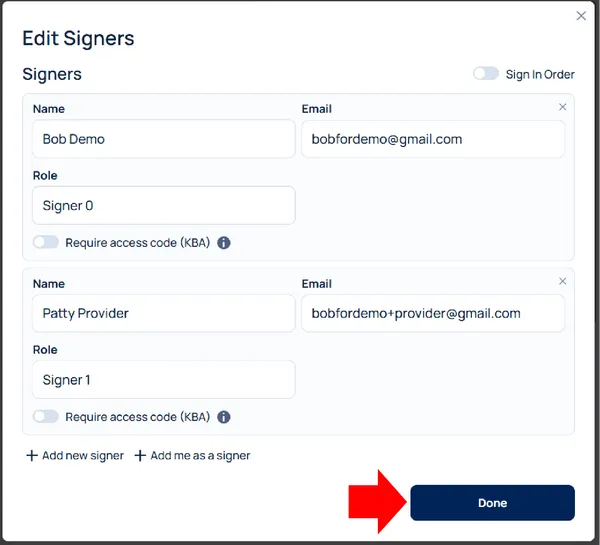
- Once a signer is added it will show up in the menu below the Assigned To heading. Click on the desired signer to assign this field to that signer.
For your convenience, the fields assigned to different signers are shown in different colors.
Fill before sending
Sometimes, you may have something to fill-in before sending the request to the recipient. For instance, in the above document, the blank after ‘based on our conversation of’ could be filled by the sender.
- Click the “Annotation” button, located below the other field buttons.
- Move your mouse to the area where any text is to be inserted (for example, to the blank space next to “Property Address” in the above example).
- Click at that location. A rectangle will appear at that location. Click inside the rectangle and type in any text.
- Resize: You may optionally resize the rectangle by clicking on either the top right, or any of the bottom two corners of the rectangle. Move the mouse while holding it down to resize the rectangle.
- You may need to resize the rectangle if the text you type does not fit it.
- Increase the width of the rectangle to allow more text to fit.
- Increase the height of the rectangle to make the font size larger.
- Move: If the rectangle appeared at a different location that you wanted, you may click the top left corner and while holding it down, move the rectangle to the desired location.
- Multiple lines: Each line of text to be inserted needs a new “insert text” field. Click again to insert another such field and type in additional text.
- Much like other fields, when you select the rectangle, you will have the option to delete it.
Delete a Signer
You may delete a signer that you added earlier to the e-sign request.
Access the list of signers from the Edit Signers button at the top right of the left menubar. Click the X icon at the top right of the signer, just above the signer’s email.
Note: All fields that were to be completed by that signer will also be removed. To avoid that, you may first assign those fields to another signer and then delete the unnecessary signer.
Tips
- Each text field should be for one line of text. Use multiple text fields for multiple lines of text. Use a similar approach for annotations (Insert-Text fields).
- Adjust field height to adjust the font size within the field.
- Ensure what you type fits within the field: giving a small field, not wide enough to hold the contents to be filled in by the signer, will degrade the signer’s experience.
- Please use a computer to prepare a file for signing with fields.
- Using a touch-screen based device will not work well for inserting fields.
- Using a small screen (such as a phone) will not work well.
- (The recipient may use a mobile device to review and sign the document.)
Related articles
-
Send an Encyro E-Sign Request
To send an electronic signature request, login to your Encyro account and: Click the Compose E-sign button in the left menu, just above your client folders....
-
Use access codes by text (or knowledge based authentication) on e-sign requests [Video]
How can I comply with IRS remote electronic signature requirements for forms 8879 and 8878? Is Encyro E-Sign KBA valid for IRS compliance? Do I need credit...
-
Save templates for Electronic Signature requests
How can re-use frequently used documents for electronic signatures? What does Save Template do in e-sign requests? Types of Templates Encyro E-Sign offers ...
-
How to Delete an E-Sign Request
How can I delete a document sent for signature? I sent the wrong document for signature, how can I delete it? I need to send a corrected request, how to de...
-
How to Edit an E-Sign Template
Can I modify a previously saved template? How to make a change to a previously saved e-sign template, such as to change the reminder settings or add an add...
-
Branding for E-Sign Requests
If you have a business logo uploaded or other brand settings configured as part of your Encyro account settings (in the Brand section), then those brand se...
-
Send an e-sign request using a saved template
How do I use a previously saved template? If you have previously saved an e-sign template, it will show up when you click the Compose E-Sign button in the ...
-
Save as draft to send later
Saving a draft If you started working on an e-sign request, such as by selecting the file and adding fields, but are not ready to send it just yet, you may...
-
Configure E-sign Options: Reminders, Login types, and more
The simplest way to send an e-sign request is to select a file, add a subject, add fields for signers to fill/sign in, and send it to their email a...
-
Sending custom forms to clients
If you have certain forms that you need your clients to fill out, such as a new patient form or other informational forms, you may use the e-sign feature t...