How to Sign an E-Sign Request [Video]
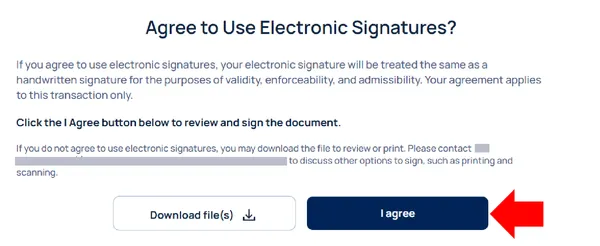
If you have received an e-sign request via Encyro, you will receive an email with a a link or a button that says “Review and Sign.” If you have an Encyro account, you may also view your incoming e-sign requests by logging in to your Encyro account. 1. Click on Review and Sign to open the signing webpage. 2. A webpage will open with either the document to be signed, or with a notice saying that an access code is needed. If an access code is needed, see these steps. 1. If the link has expired, you will get a notice saying so. In this case, you must contact the sender of the e-sign request, to request a new link. 3. On the webpage that opens, the document to sign will be grayed out and you will see a message asking you to agree to the use of electronic signatures. Click on “I Agree”. This only indicates your consent to use electronic signatures; you are not agreeing to the contents of the document itself.

-
You will then see the document to be signed. You may read the document or review specific sections as desired.
- The items for you to fill out will appear as light blue shaded rectangles.
- If you do not see any items to fill, click on “Next” near the bottom and the document will automatically scroll to the next item that you need to complete.
-
To fill in an item that you need to complete, click inside that shaded rectangle.
- If the item requires you to type in some text, such as your name, email, or other such information, you will see a cursor in the box and you may simply type in the desired text.
- If the item requires you to fill in a date, you will be shown a small calendar to select a date from (on a mobile device, there will be scroll-to-select options instead). Select a date from there. You will also be provided boxes to type the date, if you want to do that instead.
- If the item needs you to initial or sign, then you will see one or more options to type or draw your signature. You may not see all the options, depending on what is allowed for the current e-sign transaction.

- If you wish to draw your signature using your finger or stylus, but do not have a touch screen on your computer, click the Draw Via Phone tab. You will then scan a QR code with your smartphone, draw your signature on it, and once you’re ready, the signature will appear on the computer. [See details.] This feature is now available again.
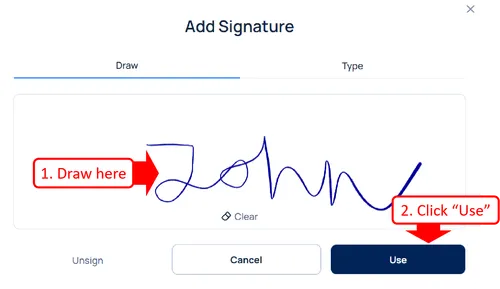
- If you have a touch screen, you may draw your signature by clicking the Draw tab (if it is not already selected) and drawing your signature in the rectangle provided. If drawing with a mouse is allowed, you may draw in that rectangle using your mouse.
- When done drawing, click “Use” and the drawn signature will be inserted in the blue box you clicked earlier.
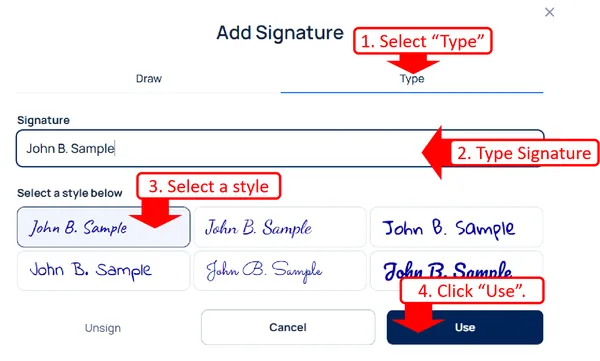
- If you wish to type your signature, select the Type tab and type it in the box labeled Signature. Usually, you will type your name.
- You will then see simulated handwriting below that.
- Select any of the simulated handwriting styles that you like and click Use. That style will be inserted into the shaded rectangle that you clicked earlier.

-
The process for creating your initials is similar to that for your signature. Not all documents may require your signature or initials.
-
Adding signatures in multiple boxes: If the document has multiple signature boxes, you need not create your signature multiple times. The next signature box that you click will automatically get the previous signature upon your click.
- Each box must be clicked separately to ensure that your signature is not added anywhere without your knowledge.
-
To change your signature: Click in any box where you already inserted your signature. You will again see the options to create your signature. Use the options to create a new signature. Then click Use.
- The signature will be changed in all the boxes where you have already signed within the document.
- The same process works for changing your initials too.
-
Continue to click inside each shaded box that requires your attention.
-
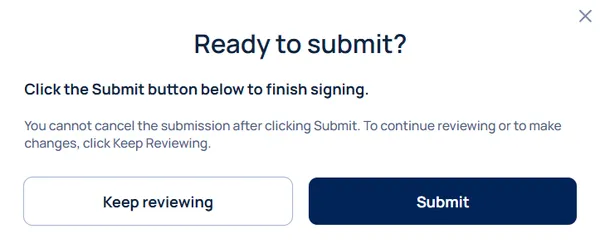
When done, click Next or Submit near the bottom. You will then see a popup that confirms that you are ready to submit your signature.
- In some cases, when you complete the last field, you may be shown the option to submit automatically.
- If you had missed any required items, the Submit button will be disabled.

- If you are ready to submit, click Submit above. Otherwise, you may click Keep Reviewing to continue to
review the document.
- If you decide not to sign at all, such as if the document contents are not acceptable, simply close the signing webpage. You may then contact the sender to send you a new document for signing.
- After you click Submit, you will be provided the option to download the document, including the data that you filled in.
- When everyone required to complete the document is done, you will get an email along with a link to download the
final completed file.
- If you were the only signer, or the last signer, the file you are offered to download after your signature will be the final file. Also, the email with the link to download the final file will come shortly after you sign.
The final file includes a special Encyro link to verify if the file has been tampered with. This useful if you do not have your own copy of the signed document, and someone sends you the file claiming you signed it at some point. You may upload the file at the provided link and that webpage will let you know if the file is valid, or if someone has tampered with or modified the contents of the file after you signed.
Related articles
-
Draw your signature on your phone when signing on a computer
A hand-drawn (a.k.a. finger drawn) signature is the most natural looking signature. In certain cases a hand-drawn signature may be required by the sender w...
-
Sign or fill with access codes by text (KBA) [Video]
The signature request requires an access code: how do I proceed? How do I get the SMS access code? My phone number is not correct, what do I do? In your em...
-
Can I print and sign?
If you have received an Encyro E-Sign request for electronic signatures, but you wish to sign on paper instead: First contact the sender to check whether t...
-
Download an E-sign file before all signers have signed
Can I download an e-signed file before all signers have signed? How do I see what I filled in an e-sign request before all signers have signed? Can I see w...
-
E-Sign: Types of Signature
The type of signature may be changed on the 'Configure E-Sign Request' screen under the heading Allowed Signature Types. You may select one or more of the ...
-
Insert fields to fill or sign in
When creating an electronic signature request, or simply a form to be filled without signatures, you must insert the fields that the recipient will complet...
-
Send an Encyro E-Sign Request
To send an electronic signature request, login to your Encyro account and: Click the Compose E-sign button in the left menu, just above your client folders....
-
How to Re-Send an E-Sign request?
If the e-sign request you previously sent has expired, and some or all signers have still not signed, you may use the re-send option to extend the expiry. ...