Organization and User Upload Page Web Addresses
When you create an organization (add one or more users to your Pro account), you get an additional upload page for the organization, besides an upload page for yourself and each of the users within your organization. For example, if you are a Pro member, and add two additional staff members, then you will have a total of 4 upload pages: 3 user upload pages (1 for yourself, 1 each for your staff members) and 1 organization level upload page.
It is up to you to use all or only some of the upload pages available to your organization.
Decide Addresses for Organization and Users
Organization Uploads: If you will be using the organization level upload page, we recommend that you set the web address for it first. For instance, you could set the upload page address for it to be based on your business name.
User Uploads: For the user level upload pages, we recommend you use an address that uses the organization level address or organization initials as the prefix. The organization level upload page address will be automatically pre-filled in the user level upload page address entry to suggest you to use that. You may delete or change that prefix if desired.
For example, if the business name is Alice Bob and Charlie LLC, then the organization level upload page address
may be set as www.encyro.com/alicebobcharlie.
For the user Mary within the organization, you could use an upload page address similar
to www.encyro.com/alicebobcharlie-mary or www.encyro.com/abc-mary or some other address such
as www.encyro.com/abc-sales (e.g. if Mary takes care of the Sales Department within your organization).
Set or Change Upload Page Web Addresses
Organization Upload Page Web Address
You must have Administrator or Brand Manager permissions for this (the initial Pro member who creates the organization has all permissions by default).
On the Settings page:
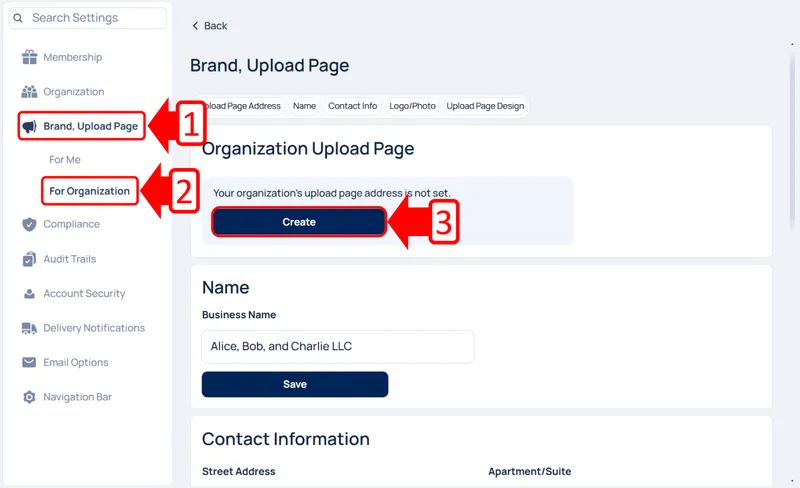
- Click “Brand, Upload Page” then “For Organization.” Look under the heading Organization Upload Page. Below it, there will be a light blue box, with a button labeled “Create.” Click that button.

-
After this, you will be walked through the process of creating your organization’s upload page.
-
If you like, you can enter a business name, which will otherwise default to your organization’s name.
-
Then, type the web address you want in the address entry box under the section “Create upload page URL.”
-
Click “Continue.”
-
Optionally, enter contact information such as your organization’s phone number, address, and fax number in the appropriate boxes, and click “Continue” once more.
-
Optionally, upload a logo for your organization by clicking “Upload” under the “Logo” section. This logo will be displayed on your upload page.
-
Optionally, You may preview and customize your organization’s upload page design and theme by clicking “Preview and Customize.” Choose from the theme options, and click “Apply Theme.” Otherwise, just click “Continue.” You can customize the theme later at any time.
-
Click “Continue” again and your organization’s upload page is all set!
If you had already used the desired name previously for the initial Pro user account, that is OK. Setting the same name for the organization will cause that address to be used for your organization upload page. The upload page address will continue to work for your clients - they will see the organization upload page when they visit it. Your brand settings such as your business logo and design theme will be automatically carried over (you may change it if desired).
See also: Who Receives Organization Level Uploads.
User Level Upload Pages
You must have Administrator permissions for this (the initial Pro member who creates the organization has all permissions by default).
-
On the Settings page, click “Organization.”
-
Scroll down to the heading Manage Users. In the same row or box as the user entry you want to assign an upload page address to, click ‘Edit.’
-
In the dialog shows up, find the user’s current (or blank) upload page address. Enter the desired address in the address entry box. If a prefix based on your organization level upload page web address is filled in for you, feel free to use it or to delete it.
-
Click Update User URL.
-
Click Close to close the dialog.
All upload pages within the organization benefit from uniform organizational branding.
Related articles
-
Upload Page Branding (Organization)
A user with brand manager permissions can set the brand elements (logo, organization contact information, upload page design theme and colors) for the orga...
-
User Level Upload Page Branding
Design Theme and Logo: Each user's upload page automatically receives the organization level design theme template, colors, and business logo (as explained...
-
How do I add my staff to my Encyro account?
An Encyro Pro member can add additional users (employees, team-mates, practice partners, staff) at any time after purchasing their own membership. Once you...
-
Set My Upload Page Address
The only thing you must set up to activate your upload page is your upload page web address, also known as your upload page URL. All the remaining settings...
-
What can I customize on my upload page?
You can customize the following elements for your upload page: Upload page web address (URL) Your name Your business name Address Phone Fax Whether to disp...
-
Who receives secure messages sent using the organization upload page?
Besides an upload page for each user, an organizational Encyro account (created when a Pro member adds additional users) also gets an organization level up...
-
User Permissions (Roles)
The organization settings can be managed by one or more users. You may also assign specific permissions, for different areas of the organization settings p...
-
What are the benefits of a Team/Organizational account?
How is a team account different from separate Pro accounts for the same people? When you add add additional users or employees (team-mates, practice partne...